Wednesday, August 27, 2014

Write Excel File Using Apache POI in Java

Hi All,

Editing Microsoft documents using a java program might be useful in certain cases. For that there are various libraries. Here I'm going to show you how you can use the Apache POI with Microsoft Documents. More details are available here.

I had to use Apache POI to create and write values received from Arduino, to an Excel Sheet. So here I'm going to show you how you can write values to an Excel Sheet.

First download the latest release from Apache POI. It can be downloaded from here.

Create a new project in Eclipse and create a new class named 'WriteExcel.java'. Add a new folder to the project named 'lib'. Extract the Apache POI library and copy the 'poi-3.10.1-20140818.jar' to the lib folder. Then add the jar to the project by Right Click the Project -> Build Path -> Configure Build Path -> Add JARs.


Now we can start coding the 'WriteExcel.java' class.
Following is the complete code.

import java.io.FileNotFoundException;
import java.io.FileOutputStream;
import java.io.IOException;

import org.apache.poi.hssf.usermodel.HSSFWorkbook;
import org.apache.poi.ss.usermodel.Cell;
import org.apache.poi.ss.usermodel.Row;
import org.apache.poi.ss.usermodel.Sheet;
import org.apache.poi.ss.usermodel.Workbook;
import org.apache.poi.ss.util.WorkbookUtil;


public class WriteExcel {
 
 public static void main(String[] args) {
  Workbook workbook = new HSSFWorkbook(); //Create a workbook object
  
  //Create a sheet inside the workbook. There are several ways to do this. 
  //1.Create sheet with default name
  Sheet sheet1 = workbook.createSheet(); 
  //2.Create Sheet with Valid Name
  Sheet sheet2 = workbook.createSheet("ValidName"); 
  //3.Create Sheet with any (may be invalid) name
  //createSafeSheetName() will make it correct
  Sheet sheet3 = workbook.createSheet(WorkbookUtil.createSafeSheetName("%?%#23InvalidName"));
  
  //Let's write some values to rows and columns in sheet1
  
  for (int i = 0; i < 20; i++) {
   //Create a row in sheet 1 assign it to "Row" object.
   Row row = sheet1.createRow(i);
   for (int j = 0; j < 10; j++) {
    //Create a cell in 'row' and assign it to "Cell" object
    Cell cell = row.createCell(j);
    //Write Values to Cell
    cell.setCellValue("( "+i+","+j+" )");
   }
  }
  
  try {
   //Create a new file output stream to write data to a File
   FileOutputStream fileOutputStream = new FileOutputStream("FirstExcel.xls");
   //Write values to the file
   workbook.write(fileOutputStream);
   //Cose file output stream
   fileOutputStream.close();
  } catch (FileNotFoundException e) {
   // TODO Auto-generated catch block
   e.printStackTrace();
  } catch (IOException e) {
   // TODO Auto-generated catch block
   e.printStackTrace();
  }
 }
 
}

Now run the file and once you refresh the project, you'll see the "FirstExcel.xls" file added to your project. Open it. Following is the output.


Hope that helps, 
Thank You. :-) 

PHP Send Mail with XAMPP Localhost Using PHPMailer

Hi All,

When developing a website, you might want to send a mail using PHP script through the localhost, specially when developing pages like Contact Us pages.

There are several ways we can do this.

One way is to send the mail using XAMPP by changing the php.ini and sendmail.ini. I have tried to use this method, but couldn't get any good result. In some posts readers have complained that it does work at times, but not every time.

Another way is using PHPMailer. It's an opensource code that helps to send mails via PHP. This is the best method I came across and it's really really easy to integrate in your site. You can read more about PHPMailer from this link.

NOTE : Before you are trying to work with the PHPMailer and Google SMTP, one important thing you should do is to Allow Less Secure Access in the Google Account you are using to Authenticate mailing. You can do it using this link

Download the PHPMailer from github and extract it to your site. If you are using XAMPP the location would be like "C:\xampp\htdocs\your_site\email". Now first you have to develop a php file that can submit a form. Following is a template of a contact form. You can add additional fields as you want.

<div class="col-md-8" id="divMain">

    <h1>Contact Us</h1>
    <h3 style="color:#8EB037;"><?php echo @$_GET['msg'];?></h3>
    <hr/>
 <!--Start Contact form -->                                                  
    <form name="contactform" method="post" action="email/index.php" class="form-horizontal" role="form" onsubmit="return validation();">
        <div class="form-group">
            <label for="inputName" class="col-md-2 control-label" style="text-align:left;">Name</label>
            <div class="col-md-10">
                <input type="text" class="form-control" id="inputName" name="inputName" placeholder="Your Name">
            </div>
        </div>
        <div class="form-group">
            <label for="inputEmail1" class="col-md-2 control-label" style="text-align:left;">Email</label>
            <div class="col-md-10">
                <input type="text" class="form-control" id="inputEmail" name="inputEmail" placeholder="Your Email">
            </div>
        </div>
        <div class="form-group">
            <label for="inputSubject" class="col-md-2 control-label" style="text-align:left;">Subject</label>
            <div class="col-md-10">
                <input type="text" class="form-control" id="inputSubject" name="inputSubject" placeholder="Subject Message">
            </div>
        </div>
        <div class="form-group">
            <label for="inputPassword1" class="col-md-2 control-label" style="text-align:left;">Message</label>
            <div class="col-md-10">
                <textarea class="form-control" rows="4" id="inputMessage" name="inputMessage" placeholder="Your message..."></textarea>
            </div>
        </div>
        <div class="form-group">
            <div class="col-md-offset-2 col-md-10">
                <button type="submit" class="btn btn-primary pull-right" value="submit" name="submit" >
                    Send Message
                </button>
            </div>
        </div>
    </form>  
 <!--End Contact form -->            
</div>

Note : Here I have used bootstrap 3 for the contact form. I placed my contact form in the directory "C:\xampp\htdocs\your_site\contact.php".

Then in the email folder ("C:\xampp\htdocs\your_site\email") include the javascript validation for the validation of form fields and index.php for sending the mail. Following is the index.php code.

require_once 'phpmailer/PHPMailerAutoload.php';

 if(isset($_POST['submit']))
 {
 $name = $_POST['inputName'];
 $email = $_POST['inputEmail'];
 $query = $_POST['inputMessage'];
 $email_from = $name.'<'.$email.'>';
 $subject = $_POST['inputSubject'];

 $message="   
    
   Name:
  $name     
  

   Email-Id:
  $email     
  

   Message:
  $query     

 ";

 $mail = new PHPMailer;

 $mail->isSMTP(); // Set mailer to use SMTP
 $mail->SMTPAuth = true; // Enable SMTP authentication
 //$mail->SMTPDebug = 2; //Please enable debug if you want to check if the mail sent successfully.

 $mail->Host = 'smtp.gmail.com';  // Specify main and backup SMTP servers
 $mail->Username = 'yourname@gmail.com';    // SMTP username
 $mail->Password = 'yourpassword';  // SMTP password
 $mail->SMTPSecure = 'ssl';   // Enable encryption, 'ssl' also accepted
 $mail->Port = 465; 

 $mail->addAddress('yourname@gmail.com', 'YourName');
 $mail->From = $email;
 $mail->FromName = $name;
 $mail->Subject = $subject;
 $mail->Body    = $message;
 $mail->AltBody = $message;

 if(!$mail->send()) {
  header("Location:../contact.php?msg=Error To send Email !");
 } else {
  header("Location:../contact.php?msg=Successful Submission! Thankyou for contacting us.");
 }
 }

Following is the javascript validation

 function validation()
 {
    
 var contactname=document.contactform.inputName.value;
 var name_exp=/^[A-Za-z\s]+$/;
 if(contactname=='')
 {
  alert("Name Field Should Not Be Empty!");
  document.contactform.inputName.focus();
  return false;
 }
 else if(!contactname.match(name_exp))
 {
  alert("Invalid Name field!");
  document.contactform.inputName.focus();
  return false;
 }
 
 var email=document.contactform.inputEmail.value;
 //var email_exp=/^[A-Za-z0-9\.-_\$]+@[A-Za-z]+\.[a-z]{2,4}$/;
 var email_exp=/^\w+([-+.']\w+)*@\w+([-.]\w+)*\.\w+([-.]\w+)*$/;
 if(email=='')
 {
  alert("Please Enter Email-Id!");
  document.contactform.inputEmail.focus();
  return false;
 }
 else if(!email.match(email_exp))
 {
  alert("Invalid Email ID !");
  document.contactform.inputEmail.focus();
  return false;
 }
 
 
 var message=document.contactform.inputMessage.value;
 if(message=='')
 {
  alert("Query Field Should Not Be Empty!");
  document.contactform.inputMessage.focus();
  return false;
 }


 var subject = document.contactform.inputSubject.value;
 if(subject=='')
 {
  alert("Subject Should Not Be Empty!")
  document.contactform.inputSubject.focus();
  return false;
 }

    return true;
 }


Place the javascript file in the "C:\xampp\htdocs\your_site\email".

Now you can send the mails using your contact form.

Hope that helps,
Thank You.

Reference : https://github.com/Synchro/PHPMailer

Monday, August 25, 2014

How to Develop a Collage/Tile/Grid Image Slider with Bootstrap 3

Hi All,

Recently I had to work on a website and I was asked to develop a slideshow that will fade and change the images that are positioned in a grid. This grid is not like a exact square thumbnail grid. It has different sizes and images with different sizes are there. Although we could do this easily in a static way, making this responsive was kind of a challenge for me. So I decided to use Bootstrap and Camera JQuery Plugin. This is a great plugin that you can use and customize as you want.

So the layout of the grid is like this.

In each cell there are image sliders with various effects.

To do this we have to implement this grid structure using Bootstrap. To study further about the Bootstrap Grid System, follow this link.

Following is our grid structure and the related css. I have colored the divs to understand the structure.

<div class="container">

    <div class="row">
        <div class="col-xs-4 collage-cell-big" style="background:blue;"></div>
        <div class="col-xs-8 collage-cell-big" style="background:green;"></div>  
    </div>

    <div class="row">
        <div class="col-xs-6 collage-cell-small" style="background:yellow;"></div>
        <div class="col-xs-6 collage-cell-small" style="background:orange;"></div>
    </div>

</div>

.collage-cell-big{
    height: 359px;
    padding-left: 2px;
    padding-right: 2px;
}

.collage-cell-small{
    height: 189px;
    padding-left: 2px;
    padding-right: 2px;
    padding-top: 4px;
}

Output is like this.

Next have to link the camera slide css and javascript here. 
<link href="scripts/camera/css/camera.css" rel="stylesheet" type="text/css" />

<script src="scripts/camera/scripts/camera.min.js" type="text/javascript"></script>
    <script src="scripts/easing/jquery.easing.1.3.js" type="text/javascript"></script>

Then we have to add the camera slide sliders inside this div structure. Following is the code. 

<div class="container">

<div class="row">
    <div class="col-xs-4 collage-cell-big" style="background:blue;">
        <div id="camera_wrap_1">
                <div data-src="images/wix/1_1.jpg" ></div>
                <div data-src="images/wix/1_2.jpg" ></div>
        </div>
    </div>

    <div class="col-xs-8 collage-cell-big" style="background:green;">
        <div id="camera_wrap_2">
                <div data-src="images/wix/2_1.jpg" ></div>
                <div data-src="images/wix/2_2.jpg" ></div>
        </div>
    </div>
      
</div>

<div class="row">
  <div class="col-xs-6 collage-cell-small" style="background:yellow;">
      <div id="camera_wrap_3">
            <div data-src="images/wix/3_1.jpg" ></div>
            <div data-src="images/wix/3_2.jpg" ></div>
        </div>
  </div>
  <div class="col-xs-6 collage-cell-small" style="background:orange;">
      <div id="camera_wrap_4">
            <div data-src="images/wix/4_1.jpg" ></div>
            <div data-src="images/wix/4_2.jpg" ></div>
        </div>
  </div>
</div>

</div>

Finally We need to add the jquery call to work the sliders.

function startCamera() {
    $('#camera_wrap_1').camera({ fx: 'random', time: 500, loader: 'none', playPause: false, navigation: false, height: '359px', pagination: false });
    $('#camera_wrap_3').camera({ fx: 'random', time: 500, loader: 'none', playPause: false, navigation: false, height: '189px', pagination: false });
    $('#camera_wrap_2').camera({ fx: 'random', time: 500, loader: 'none', playPause: false, navigation: false, height: '359px', pagination: false });
    $('#camera_wrap_4').camera({ fx: 'random', time: 500, loader: 'none', playPause: false, navigation: false, height: '189px', pagination: false });
}
$(function(){startCamera()});

Following is the complete HTML code.

<!DOCTYPE html>
<html lang="en">

<head>

    <meta charset="utf-8">
    <meta http-equiv="X-UA-Compatible" content="IE=edge">
    <meta name="viewport" content="width=device-width, initial-scale=1">
    <meta name="description" content="">
    <meta name="author" content="">

    <title>Thumbnail Gallery - Start Bootstrap Template</title>

    <!-- Bootstrap Core CSS -->
    <link href="styles/bootstrap.min.css" rel="stylesheet">
    <link href="styles/bootstrap-theme.min.css" rel="stylesheet">

    <!-- Custom CSS -->
    <link href="scripts/camera/css/camera.css" rel="stylesheet" type="text/css" />


    <!-- HTML5 Shim and Respond.js IE8 support of HTML5 elements and media queries -->
    <!-- WARNING: Respond.js doesn't work if you view the page via file:// -->
    <!--[if lt IE 9]>
        <script src="https://oss.maxcdn.com/libs/html5shiv/3.7.0/html5shiv.js"></script>
        <script src="https://oss.maxcdn.com/libs/respond.js/1.4.2/respond.min.js"></script>
    <![endif]-->
    <link href="styles/custom.css" rel="stylesheet" type="text/css" />
    <style type="text/css">
    .collage-cell-big{
        height: 359px;
        padding-left: 2px;
        padding-right: 2px;
    }

    .collage-cell-small{
        height: 189px;
        padding-left: 2px;
        padding-right: 2px;
        padding-top: 4px;
    }
    </style>

</head>

<body>

    <!-- Page Content -->
    <div class="container">

    <div class="row">
        <div class="col-xs-4 collage-cell-big" style="background:none;">
            <div id="camera_wrap_1">
                    <div data-src="images/wix/1_1.jpg" ></div>
                    <div data-src="images/wix/1_2.jpg" ></div>
            </div>
        </div>

        <div class="col-xs-8 collage-cell-big" style="background:none;">
            <div id="camera_wrap_2">
                    <div data-src="images/wix/2_1.jpg" ></div>
                    <div data-src="images/wix/2_2.jpg" ></div>
            </div>
        </div>
          
    </div>

    <div class="row">
      <div class="col-xs-6 collage-cell-small" style="background:none;">
          <div id="camera_wrap_3">
                <div data-src="images/wix/3_1.jpg" ></div>
                <div data-src="images/wix/3_2.jpg" ></div>
            </div>
      </div>
      <div class="col-xs-6 collage-cell-small" style="background:none;">
          <div id="camera_wrap_4">
                <div data-src="images/wix/4_1.jpg" ></div>
                <div data-src="images/wix/4_2.jpg" ></div>
            </div>
      </div>
    </div>

    </div>
    <!-- /.container -->

    <!-- jQuery Version 1.11.0 -->
    <script src="scripts/jquery-1.11.1.min.js"></script>

    <!-- Bootstrap Core JavaScript -->
    <script src="scripts/bootstrap/js/bootstrap.min.js"></script>

    <script src="scripts/camera/scripts/camera.min.js" type="text/javascript"></script>
    <script src="scripts/easing/jquery.easing.1.3.js" type="text/javascript"></script>
    <script type="text/javascript">
        function startCamera() {
            $('#camera_wrap_1').camera({ fx: 'random', time: 500, loader: 'none', playPause: false, navigation: false, height: '359px', pagination: false });
            $('#camera_wrap_3').camera({ fx: 'random', time: 500, loader: 'none', playPause: false, navigation: false, height: '189px', pagination: false });
            $('#camera_wrap_2').camera({ fx: 'random', time: 500, loader: 'none', playPause: false, navigation: false, height: '359px', pagination: false });
            $('#camera_wrap_4').camera({ fx: 'random', time: 500, loader: 'none', playPause: false, navigation: false, height: '189px', pagination: false });
        }
        $(function(){startCamera()});
    </script>

</body>

</html>

Hope that helps,
Thank You.

Saturday, August 16, 2014

XAMPP : Error: Apache shutdown unexpectedly.

Hi All, 

This is just a small blog post for trouble shooting the issues in installing the XAMPP server in Windows 8.1. I downloaded the setup from XAMPP site and installed it. When I tried to start the Apache service I got the following error. 

8:56:56 PM  [Apache] Attempting to start Apache app...
8:56:56 PM  [Apache] Status change detected: running
8:56:57 PM  [Apache] Status change detected: stopped
8:56:57 PM  [Apache] Error: Apache shutdown unexpectedly.
8:56:57 PM  [Apache] This may be due to a blocked port, missing dependencies, 
8:56:57 PM  [Apache] improper privileges, a crash, or a shutdown by another method.
8:56:57 PM  [Apache] Press the Logs button to view error logs and check
8:56:57 PM  [Apache] the Windows Event Viewer for more clues
8:56:57 PM  [Apache] If you need more help, copy and post this
8:56:57 PM  [Apache] entire log window on the forums

One main reason for this issue is that port 80 and 443 are used by other applications. One application is Skype. To solve this, you can go to Skype Options-> Advanced Settings -> Connection -> Uncheck the Use port 80 and 443 for additional incoming connections. 


Another application is VMWare. If  the issue caused by this, open the task manager, go to services and stop the VMWareHostd service. 


Doing one of the above changes will most probably solve your problem. 

Hope that helps. 

Thank you :-) 


Wednesday, August 13, 2014

Get the Folder Tree and Read HTML Files in Python

Hi All,

This might be really stupid, but it was kind of useful for me. I downloaded some templates for a website and I wanted to open them all in Chrome at once. Going to the folders again and again is not that interesting,right? So here's a simple python script that will help to read all the index.html files from the main folder you have saved your templates.

import os
import webbrowser

print "Index File Reader"
print "*"*20

folderPath = "C:\Website Templates"
fileTreeTuple = os.walk(folderPath)

for root, dirs, files in fileTreeTuple:
    for fileName in files:
        if fileName == "index.html" or fileName == "index.htm":
            fullPath = os.path.join(root,fileName)
            print fullPath
            webbrowser.open_new_tab(fullPath)

Thank You :-)

Reference :
https://docs.python.org/2/library/os.html#os.listdir
https://docs.python.org/2/library/webbrowser.html?highlight=webbrowser#webbrowser

Thursday, August 7, 2014

Using JFreeChart to Show Arduino Data

Hi All,

In the previous tutorial I showed you how we can develop a simple chart application using JFreeChart. Now let's do something interesting with that. We are going to read some data from a Arduino and show that in a java chart. We are using the Java RxTx library for communication and JFreeChart for displaying the chart. Lets' start then.

First we will write a simple application that would send some random data from Arduino. There are situations where you have to send some sensor values for processing in a Java application. So here I'm trying to send some values that will appear like some sensor values.

float sensor_values[3]; //declare an arrary of 3 float values
float val_1,val_2,val_3; //declare 3 sensor values

void setup()
{
  Serial.begin(9600); //Start serial
  
  // Generate 3 random numbers between -100 and +100
  val_1 = random(-100,100); 
  val_2 = random(-100,100);
  val_3 = random(-100,100);
  
}

void loop()
{
  //if any value is equal to 100 start again from -100  
  if(val_1 >= 100){
    val_1 = -100;
  }
  else{
    val_1++;
  }
  
  if(val_2 >= 100){
    val_2 = -100;
  }
  else{
    val_2++;
  }
  
  if(val_3 >= 100){
      val_3 = -100;
  }  
  else{
    val_3++;
  }
  
  // Assign the values to array
  sensor_values[0] = val_1;
  sensor_values[1] = val_2;
  sensor_values[2] = val_3;
  
  //call the write sensor values function to write the values to serial port
  writeSensorValues(sensor_values);
}

//Method that will write the values to the serial port
void writeSensorValues(float values [])
{
  Serial.print("STX,"); //STX is used to identify the start of the string
  for(int i = 0 ; i < 3 ; i++){
    Serial.print(values[i]);
    Serial.print(","); // Seperate each value with ',' to identify them seperately
  }
  Serial.println("ETX"); //ETX is used to identify the end of the string
}

Now the Arduino code is complete. You can upload this code to your Arduino and check the output using the Serial Monitor.
Our next step is to write the Java Program that will read from the Arduino and display that data in a chart. I will get the help of the tutorials on Java RxTx for Serial Communication and JFree Chart tutorial to do this. I have described how to add the RxTx and JFreeChart libraries to the project in the above tutorials.

First create a class named 'SerialChart.java' and extend it from the ApplicationFrame class and implement the SerialPortEventListener class. Then add the constructor and add the unimplemented methods.


Now let's declare the variables that we need to use.

 private TimeSeriesCollection timeSeriesCollection; // Collection of time series data
 private XYDataset xyDataset; // dataset that will be used for the chart
 private TimeSeries seriesX; // X series data
 private TimeSeries seriesY; // Y series data
 private TimeSeries seriesZ; // X series data
 
 private BufferedReader input; // input reader
 private OutputStream output; //output reader
 private SerialPort serialPort; // serial port object
 
 private String [] PORT_NAMES = {"COM7"}; // available ports

Then let's start with a method that will initialize the serial port connection.

private void initializeSerial()
 {
  CommPortIdentifier portId = null;
  Enumeration portEnum = CommPortIdentifier.getPortIdentifiers();
  
  while(portEnum.hasMoreElements())
  {
   CommPortIdentifier currentPortIdentifier = (CommPortIdentifier)portEnum.nextElement();
   for(String portName : PORT_NAMES)
   {
    if(currentPortIdentifier.getName().equals(portName))
    {
     portId = currentPortIdentifier;
     break;
    }
   }   
  }
  
  if(portId == null)
  {
   System.out.println("Port not found");
   return;
  }
  
  try {
   
   serialPort = (SerialPort)portId.open(this.getClass().getName(), 2000);
   serialPort.setSerialPortParams(9600, SerialPort.DATABITS_8, SerialPort.STOPBITS_1, SerialPort.PARITY_NONE);
   
   input = new BufferedReader(new InputStreamReader(serialPort.getInputStream()));
   output = serialPort.getOutputStream();
   
   serialPort.addEventListener(this);
   serialPort.notifyOnDataAvailable(true);
   
  } catch (Exception e) {
   System.err.println("Initialization failed : " + e.toString());
  }
 }

Now let's create the method to return a chart object.

 private JFreeChart createChart() {

        JFreeChart chart = ChartFactory.createTimeSeriesChart(
            "Sensor Data Display",  // title
            "Time",             // x-axis label
            "Sensor Value",   // y-axis label
            timeSeriesCollection,            // data
            true,               // create legend?
            true,               // generate tooltips?
            false               // generate URLs?
        );

        chart.setBackgroundPaint(Color.white);

        XYPlot plot = (XYPlot) chart.getPlot();

        DateAxis axis = (DateAxis) plot.getDomainAxis();
        axis.setAutoRange(true);
  axis.setFixedAutoRange(60000.0);

        return chart;
 }

We can complete the constructor now.

public SerialChart(String title) {
  super(title);
  
  initializeSerial();
  
  timeSeriesCollection = new TimeSeriesCollection();
  seriesX = new TimeSeries("SensorX");
  seriesY = new TimeSeries("SensorY");
  seriesZ = new TimeSeries("SensorZ");
  
  timeSeriesCollection.addSeries(seriesX);
  timeSeriesCollection.addSeries(seriesY); 
  timeSeriesCollection.addSeries(seriesZ);
  
  JFreeChart chart = createChart();
  ChartPanel chartPanel = new ChartPanel(chart);
  chartPanel.setFillZoomRectangle(true);
  chartPanel.setMouseWheelEnabled(true);
  chartPanel.setPreferredSize(new java.awt.Dimension(1000,500));
  setContentPane(chartPanel);
 }

Next we have to complete the serialEvent method so that it will respond to the data received from Arduino.


 @Override
 public synchronized void serialEvent(SerialPortEvent event) {
  if(event.getEventType() == SerialPortEvent.DATA_AVAILABLE)
  {
   try
   {
    String inputLine = input.readLine();
    String [] inputValues = inputLine.split(",");
    
    if(inputValues[0].equals("STX") && inputValues[inputValues.length-1].equals("ETX"))
    {
     float in_x = new Float(inputValues[1]).floatValue();
     float in_y = new Float(inputValues[2]).floatValue();
     float in_z = new Float(inputValues[3]).floatValue();
     
     this.timeSeriesCollection.getSeries(0).add(new Millisecond(),in_x);
     this.timeSeriesCollection.getSeries(1).add(new Millisecond(),in_y);
     this.timeSeriesCollection.getSeries(2).add(new Millisecond(),in_z);
    }
    
    System.out.println(inputLine);
   }
   catch(Exception ex)
   {
    ex.printStackTrace();
   }
  }
 }

We also have to write a method to properly close the serial port event.

public synchronized void close()
 {
  if(serialPort != null)
  {
   serialPort.removeEventListener();
   serialPort.close();
  }
 }

Finally it's the main method to bring everything together.

 public static void main(String[] args) {

  SerialChart serialChartDemo = new SerialChart("Time Series Chart Demo");
        serialChartDemo.pack();
        RefineryUtilities.centerFrameOnScreen(serialChartDemo);
        serialChartDemo.setVisible(true);

    }

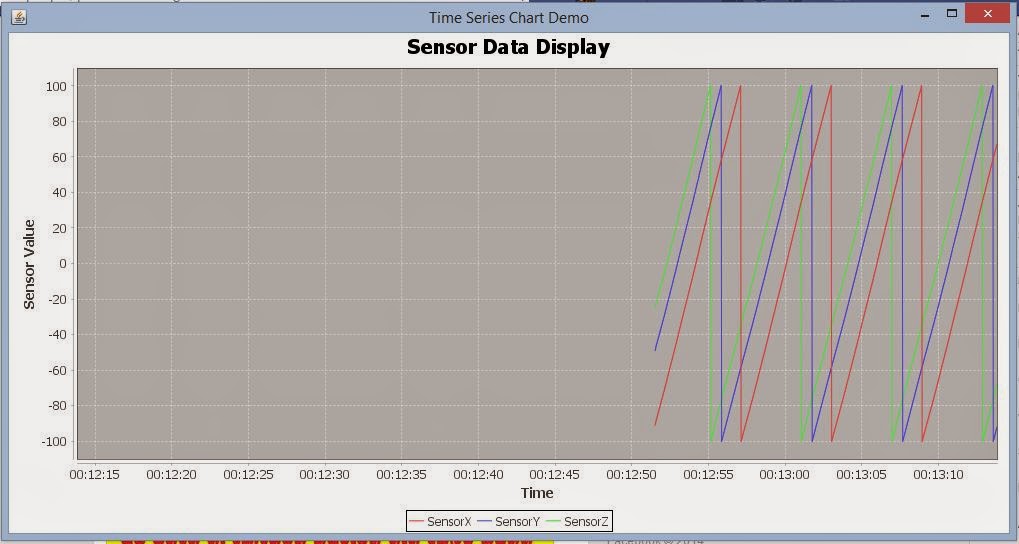
Now run the application and see the results :-). You'll get an output like this.


Following is the complete code. 

package com.dc.rxtxjfreechart;

import java.awt.Color;
import java.io.BufferedReader;
import java.io.InputStreamReader;
import java.io.OutputStream;
import java.util.Enumeration;

import gnu.io.CommPortIdentifier;
import gnu.io.SerialPort;
import gnu.io.SerialPortEvent;
import gnu.io.SerialPortEventListener;

import org.jfree.chart.ChartFactory;
import org.jfree.chart.ChartPanel;
import org.jfree.chart.JFreeChart;
import org.jfree.chart.axis.DateAxis;
import org.jfree.chart.plot.XYPlot;
import org.jfree.data.time.Millisecond;
import org.jfree.data.time.TimeSeries;
import org.jfree.data.time.TimeSeriesCollection;
import org.jfree.data.xy.XYDataset;
import org.jfree.ui.ApplicationFrame;
import org.jfree.ui.RefineryUtilities;

public class SerialChart extends ApplicationFrame implements SerialPortEventListener {

 private TimeSeriesCollection timeSeriesCollection; // Collection of time series data
 private XYDataset xyDataset; // dataset that will be used for the chart
 private TimeSeries seriesX; // X series data
 private TimeSeries seriesY; // Y series data
 private TimeSeries seriesZ; // X series data
 
 private BufferedReader input; // input reader
 private OutputStream output; //output reader
 private SerialPort serialPort; // serial port object
 
 private String [] PORT_NAMES = {"COM7"}; // available ports
 
 public SerialChart(String title) {
  super(title);
  
  initializeSerial();
  
  timeSeriesCollection = new TimeSeriesCollection();
  seriesX = new TimeSeries("SensorX");
  seriesY = new TimeSeries("SensorY");
  seriesZ = new TimeSeries("SensorZ");
  
  timeSeriesCollection.addSeries(seriesX);
  timeSeriesCollection.addSeries(seriesY); 
  timeSeriesCollection.addSeries(seriesZ);
  
  JFreeChart chart = createChart();
  ChartPanel chartPanel = new ChartPanel(chart);
  chartPanel.setFillZoomRectangle(true);
  chartPanel.setMouseWheelEnabled(true);
  chartPanel.setPreferredSize(new java.awt.Dimension(1000,500));
  setContentPane(chartPanel);
 }

 @Override
 public synchronized void serialEvent(SerialPortEvent event) {
  if(event.getEventType() == SerialPortEvent.DATA_AVAILABLE)
  {
   try
   {
    String inputLine = input.readLine();
    String [] inputValues = inputLine.split(",");
    
    if(inputValues[0].equals("STX") && inputValues[inputValues.length-1].equals("ETX"))
    {
     float in_x = new Float(inputValues[1]).floatValue();
     float in_y = new Float(inputValues[2]).floatValue();
     float in_z = new Float(inputValues[3]).floatValue();
     
     this.timeSeriesCollection.getSeries(0).add(new Millisecond(),in_x);
     this.timeSeriesCollection.getSeries(1).add(new Millisecond(),in_y);
     this.timeSeriesCollection.getSeries(2).add(new Millisecond(),in_z);
    }
    
    System.out.println(inputLine);
   }
   catch(Exception ex)
   {
    ex.printStackTrace();
   }
  }
 }
 
 private void initializeSerial()
 {
  CommPortIdentifier portId = null;
  Enumeration portEnum = CommPortIdentifier.getPortIdentifiers();
  
  while(portEnum.hasMoreElements())
  {
   CommPortIdentifier currentPortIdentifier = (CommPortIdentifier)portEnum.nextElement();
   for(String portName : PORT_NAMES)
   {
    if(currentPortIdentifier.getName().equals(portName))
    {
     portId = currentPortIdentifier;
     break;
    }
   }   
  }
  
  if(portId == null)
  {
   System.out.println("Port not found");
   return;
  }
  
  try {
   
   serialPort = (SerialPort)portId.open(this.getClass().getName(), 2000);
   serialPort.setSerialPortParams(9600, SerialPort.DATABITS_8, SerialPort.STOPBITS_1, SerialPort.PARITY_NONE);
   
   input = new BufferedReader(new InputStreamReader(serialPort.getInputStream()));
   output = serialPort.getOutputStream();
   
   serialPort.addEventListener(this);
   serialPort.notifyOnDataAvailable(true);
   
  } catch (Exception e) {
   System.err.println("Initialization failed : " + e.toString());
  }
 }

 private JFreeChart createChart() {

        JFreeChart chart = ChartFactory.createTimeSeriesChart(
            "Sensor Data Display",  // title
            "Time",             // x-axis label
            "Sensor Value",   // y-axis label
            timeSeriesCollection,            // data
            true,               // create legend?
            true,               // generate tooltips?
            false               // generate URLs?
        );

        chart.setBackgroundPaint(Color.white);

        XYPlot plot = (XYPlot) chart.getPlot();

        DateAxis axis = (DateAxis) plot.getDomainAxis();
        axis.setAutoRange(true);
  axis.setFixedAutoRange(60000.0);

        return chart;
 }

 public synchronized void close()
 {
  if(serialPort != null)
  {
   serialPort.removeEventListener();
   serialPort.close();
  }
 }
 
 public static void main(String[] args) {

  SerialChart serialChartDemo = new SerialChart("Time Series Chart Demo");
        serialChartDemo.pack();
        RefineryUtilities.centerFrameOnScreen(serialChartDemo);
        serialChartDemo.setVisible(true);

    }
}


Hope that helps. Thank You. :-) 

Tuesday, August 5, 2014

Develop a Time Series Chart Using JFreeChart

Hi All,

When we want to show a chart in our java application we can use JFreeChart library for that. Here I am going to show you how we can develop a Time Series Chart. Later we will be using this chart to display values returned from an Arduino Sensor. So lets get started.

First we have to download the JFreeChart library, extract it to a location and find the necessary jar files. You can download JFreeChart here. JFreeChart site is here.

Create a new project in Eclipse and make a folder named 'lib' inside the project folder. Then extract the library zip file and copy the 'jfreechart-1.0.19' and 'jcommon-1.0.23' jars to the 'lib' folder. Then Right Click on the project -> Build Path -> Configure Build Path -> Libraries -> Add JARs and add the two jar files in the 'lib' folder to the project.

Create a class named 'JFreeDemo1.java' and extend it from the 'ApplicationFrame' class. Then add the constructor.


Then let's create the method to generate the dataset. Here we are using a XYDataset with Time Series Collection. There are two Time Series Used here. You can add Time Series to the Time Series Collection.


private XYDataset createXYDataSet()
 {  
  TimeSeriesCollection dataset = new TimeSeriesCollection();
  TimeSeries series2012 = new TimeSeries("Car Sales");
  TimeSeries series2013 = new TimeSeries("Van Sales");
  
  Random rand = new Random();
  
  for(int type = 0 ; type <2 ; type++ ){
   for(int mon = 1 ; mon < 13 ; mon++ )
   {
    Month month = new Month(mon, 2013); 
    int value = rand.nextInt(700)+300;
    
    if(type == 0)
    {
     series2012.add(month, value);
    }
    
    if(type == 1)
    {
     series2013.add(month, value);
    }
   }
  }
  
  dataset.addSeries(series2012);
  dataset.addSeries(series2013);
  
  return dataset;
 }


Now the dataset is ready. Next we will create a method that will return a JFreeChart. We are passing a dataset as parameter for the method. This data set will be used to create the chart.
private JFreeChart createChart(XYDataset dataset){
  JFreeChart chart = ChartFactory.createTimeSeriesChart(
      "Sales Chart", // Title
      "Month",     // Time Axis
      "Sales",     // Value Axis
      dataset,     // Dataset 
      true,      // legend
      true,      // tooltips
      false);     // generate urls
  
  XYPlot plot = (XYPlot)chart.getPlot();
  
  DateAxis dateAxis = (DateAxis)plot.getDomainAxis();
  dateAxis.setDateFormatOverride(new SimpleDateFormat("MMM-yyyy"));
  
  return chart;
 }
Now we will complete the constructor of the class.
public JFreeDemo1(String title) {
  super(title);
  JFreeChart chart = createChart(createXYDataSet());
  ChartPanel chartPanel = new ChartPanel(chart);
  chartPanel.setFillZoomRectangle(true);
  chartPanel.setMouseWheelEnabled(true);
  chartPanel.setPreferredSize(new java.awt.Dimension(800,400));
  setContentPane(chartPanel);
 }
Now we can complete the main method.
public static void main(String[] args) {
  JFreeDemo1 jfd = new JFreeDemo1("Time Series Chart Demo 01");
  jfd.pack();
  jfd.setVisible(true);
 }

Run the application and you will get a chart like this with the generated random dataset.


Following is the complete code.

package com.dc.jfreedemo;

import java.text.SimpleDateFormat;
import java.util.Random;

import org.jfree.chart.ChartFactory;
import org.jfree.chart.ChartPanel;
import org.jfree.chart.JFreeChart;
import org.jfree.chart.axis.DateAxis;
import org.jfree.chart.plot.XYPlot;
import org.jfree.data.time.Month;
import org.jfree.data.time.TimeSeries;
import org.jfree.data.time.TimeSeriesCollection;
import org.jfree.data.xy.XYDataset;
import org.jfree.ui.ApplicationFrame;

public class JFreeDemo1 extends ApplicationFrame{

 public JFreeDemo1(String title) {
  super(title);
  JFreeChart chart = createChart(createXYDataSet());
  ChartPanel chartPanel = new ChartPanel(chart);
  chartPanel.setFillZoomRectangle(true);
  chartPanel.setMouseWheelEnabled(true);
  chartPanel.setPreferredSize(new java.awt.Dimension(800,400));
  setContentPane(chartPanel);
 }
 
 private XYDataset createXYDataSet()
 {  
  TimeSeriesCollection dataset = new TimeSeriesCollection();
  TimeSeries series2012 = new TimeSeries("Car Sales");
  TimeSeries series2013 = new TimeSeries("Van Sales");
  
  Random rand = new Random();
  
  for(int type = 0 ; type <2 ; type++ ){
   for(int mon = 1 ; mon < 13 ; mon++ )
   {
    Month month = new Month(mon, 2013); 
    int value = rand.nextInt(700)+300;
    
    if(type == 0)
    {
     series2012.add(month, value);
    }
    
    if(type == 1)
    {
     series2013.add(month, value);
    }
   }
  }
  
  dataset.addSeries(series2012);
  dataset.addSeries(series2013);
  
  return dataset;
 }

 private JFreeChart createChart(XYDataset dataset){
  JFreeChart chart = ChartFactory.createTimeSeriesChart(
      "Sales Chart", // Title
      "Month",     // Time Axis
      "Sales",     // Value Axis
      dataset,     // Dataset 
      true,      // legend
      true,      // tooltips
      false);     // generate urls
  
  XYPlot plot = (XYPlot)chart.getPlot();
  
  DateAxis dateAxis = (DateAxis)plot.getDomainAxis();
  dateAxis.setDateFormatOverride(new SimpleDateFormat("MMM-yyyy"));
  
  return chart;
 }
 
 public static void main(String[] args) {
  JFreeDemo1 jfd = new JFreeDemo1("Time Series Chart Demo 01");
  jfd.pack();
  jfd.setVisible(true);
 }
}


Hope this was helpful :-) Thank You.

Saturday, August 2, 2014

Using Java RxTx library for Serial Communication With Arduino - Part 2

Hi All,

In the previous post I showed you how you can use the Java RxTx library to find the Arduino connected COM port. Now let's do something useful. We can use this for reading values sent from the Arduino. With the values, we can play around and do whatever we like. In this post I'm using the code provided by Arduino.

First let's write a tiny Arduino program that prints some strings to Serial.


Then lets use the code provided by Arduino for reading values from Arduino. So here it is. I have just modified the code to split the chunks from the input string. (Line 81)


So that it.

Hope it would help.

Thank you. :-)


Using Java RxTx library for Serial Communication With Arduino - Part 1

Hi All,

Today I'm going to show you how you can use the Java RxTx library for Serial Communication with Arduino. This small java program is just to identify from which port your Arduino is connected to the PC. So this will be a good start if you are going to use RxTx library with Arduino. 

First you have to download the RxTx library from one of these locations. 
I used the link 1 to get the library for Windows x64. You can download x86 or x64 version according to your Operating System. 

Now we have to install RxTx in our program. You can do this in two ways. Both of them are easy, lets try the first one. I'm doing this with eclipse. 

First create your project in eclipse. 


Add a new class. I will name it "CommPortTest.java"


Now lets add the RxTx library to the project. Extract the downloaded file and add it to the project using Right Click the Project -> Build Path -> Configure Build Path -> Libraries -> Add External JARs -> OK


Now Copy the two dll files (rxtxParallel.dll, rxtxSerial.dll) from the extracted library and paste it to the project folder. 


Now you are ready for coding. So use the following code. 


Now Run the program. My Arduino was connected to COM7 and here's the output. 


You can check the Part 2 here

Hope this was helpful. 

Thank You. :-) 

Reference :